
There will be times when you are working on a WordPress site when you want to add custom CSS.
Why might you want to do this? It could be for any of the following reasons:
- To add a new style to a theme which hasn’t been defined (for example, adding a new media query for a particular breakpoint).
- To change the style of an element within a theme you are using.
- To add to or modify a plugin’s default styles.
In the first and second instances, if you just have a small amount of code to change, adding a snippet of custom CSS is usually the simplest way to achieve the effect you desire.
We’ll soon look at the different ways to add WordPress custom CSS, but first let’s look at how CSS works.
The CSS Cascade
The cascade is the rule set that decides which out of many styles will be applied. Because generally only one style can be applied to an element, one CSS rule has to win over the others.
There are a few exceptions and workarounds to this principle, such as this method to create multicolored backgrounds in CSS:
But in general, the rule holds.
Two things help the browser decide upon which style to apply: breadth and specificity.
- The correct breadth = the right choice of HTML element(s) and not any others.
- The right specificity = your CSS declaration trumps other ones which target the same element(s).
To avoid tearing your hair out, read Fred’s post on changing CSS the right way. It has practical examples showing you how to target your styles correctly.
If you want to go deeper on CSS specificity, I recommend reading CSS Specificity Wars by Andy Clarke, which explains this concept beautifully. (It’s even more rewarding if you are a Star Wars fan!)
How CSS is Applied Within WordPress
If you’ve ever inspected the code of a typical WordPress site, you’ll have noticed that there are typically many stylesheets loaded from multiple sources.
How does WordPress decide which to load first? It has a specific order in which CSS styles are enqueued.
The general order is, from first to last:
- Plugins
- Child theme
- Parent theme
- Customizer
The other determining factor is hook priority. If you’re not familiar with hooks, take a read of our article on WordPress hooks for a primer.
In a nutshell, hooks are spots in themes or plugins where functions can be run. As multiple functions can be attached to hooks, WordPress needs a way to determine the order in which they will be run. That’s where priority comes in.
The default priority for a hooked function — or callback — is 10. A callback with a number lower than this will run earlier, and a function with a higher number will run later.
For CSS styles, this means that if you are trying to override a style, you want your code to be loaded with a greater priority than the original stylesheet.
Where You Can Add WordPress Custom CSS
Here are three main places that you can add custom CSS to WordPress.
- Themes
- Plugins
- WordPress Customizer
Let’s take a look at these in turn.
1. Your Theme’s style.css File
The most obvious way to change a theme’s style is to edit the style.css file.
Assuming you are not writing your own theme from scratch, there are a couple of ways to go about this. Let’s look at the one you should not do first.
The dangerous way is to go to Appearance > Theme Editor directly. If you try this with your active theme, you’ll see a warning like this:

The problem with this method is that you are editing the file directly on the server. If you make a mistake and save it, you won’t be able to get your original style.css file back. That is, not unless you have a backup, or delete the theme and install it again. In either case, you’ll lose your latest customizations.
The safer way is to create a child theme, as the message indicates. That way, you leave your parent theme intact if the worst should happen. Child themes are also best practice for WordPress, and essential if you want to change any templates or functions in your theme.
When you have made a child theme, you should edit your style.css file in a text editor and upload your modified file via FTP. If you want to be more advanced, you can use a version control system like Git to keep track of the file changes on your local machine.
2. WordPress Custom CSS in Plugins
Most page builder plugins offer you a lot of influence over styles. For example, in Beaver Builder, you can add styles to individual rows or modules via their controls:

This background color is added to a separate stylesheet generated by Beaver Builder.
You can also change the styles of elements on just one page:

But what if you don’t like a plugin’s styles, but they are loaded anyway?
Good WordPress plugin developers will include the option to disable styles in their plugin if you want to add your own. This may save you from having to write style rules with !important in them to try and override the existing styles.
Another option is to use the wp_dequeue_style() function to dequeue styles you don’t want loaded. The catch is that you have to identify them first. For more on this, read Jeff Starr’s tutorial on removing plugin scripts and styles.
To remove unwanted CSS more easily, you can try the Perfmatters plugin, which lets you control plugin styles and scripts down to a per-page level.
3. Adding CSS in the WordPress Customizer
The WordPress Customizer, which arrived in WordPress 4.7, is a helpful tool for adding your own CSS, as your custom CSS is loaded after all other styles.
You access the WordPress CSS editor via Appearance > Customize > Additional CSS in the menu, or simply Appearance > Edit CSS, which redirects there.
Through the magic of AJAX, any styles you add to the Customizer will update in the preview window in real time. A useful feature is that you can look at a web page in desktop, tablet or mobile view.

Remember to use the Publish button to save your styles.
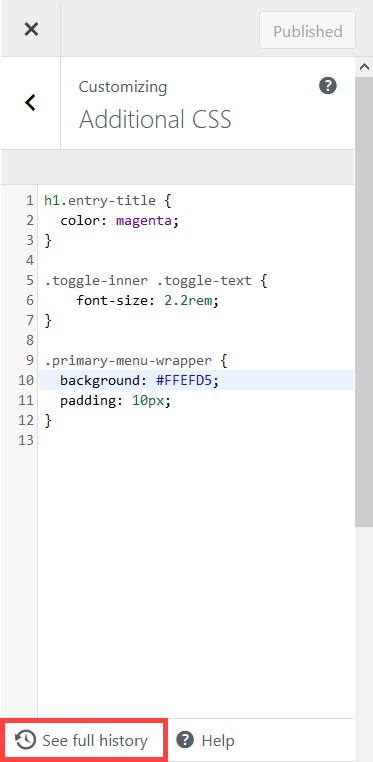
Note that your Customizer styles are loaded inline into the <head> of your theme. Here’s an example:
<style type="text/css" id="wp-custom-css">h1.entry-title {
	color: magenta;
}

.toggle-inner .toggle-text {
	font-size: 2.2rem;
}</style>
So the Customizer can be useful to test out styles. Once you’re happy with them, you can transfer them into a child theme later on.
Where are custom CSS styles stored?
You probably know that custom CSS is stored in your WordPress database. What you might not be aware of is that custom CSS is a post type which has revisions.
Here’s a query to find them:
SELECT post_title, post_name, post_content, post_type FROM wp_posts WHERE post_type = 'custom_css';
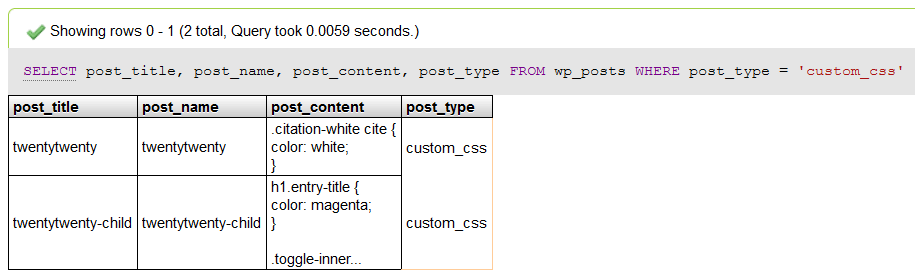
You will see that post_title and post_name both correspond to the theme slug and the post_content contains your custom CSS rules.
While it’s reassuring to know that your custom CSS is safe in case you accidentally delete it (!) there isn’t a simple way to access your CSS revisions like you can with post revisions.
Unless you add a plugin.
Extra Custom CSS tools with Jetpack
Developers have mixed opinions on the Jetpack plugin — some love it, while others loathe it.
Jetpack has had a bad rap because it’s really several plugins in one, and some of its functionality is automatically enabled whether you need it or not.
For the record, we have found Jetpack has some useful features such as connecting your website to WordPress.com.
However, Jetpack’s Custom CSS enhancements are really nifty.
To enable them, once you have installed Jetpack you need to go to Jetpack > Settings and toggle the Enhance CSS customization panel.

Using Jetpack, you can:
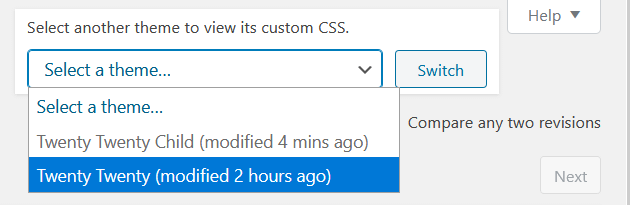
See your last 25 custom CSS revisions in the usual way.

You can view custom CSS for any other themes you have added it to as well.
Set a different content width for full size images. You will need to regenerate your existing image sizes if you use this setting.
Start fresh with CSS, by disabling your theme’s CSS completely.
This means that if you are using a parent theme rather than a child theme, you will keep the PHP and HTML markup of the theme, but your theme’s style.css will not be loaded — effectively giving you a blank slate.

If you are using a child theme with no or minimal CSS, you may not see any difference at all if you use this option.
Use CSS preprocessors such as Sass or LESS. To get started, enable LESS or Sass (SCSS syntax) from the Preprocessor select box.
This is a particularly easy way to start with a preprocessor if you are new to them.
Read Fred’s post if you want to know why Sass is awesome.
Here is a simple example, using Sass variables to change the color of post title links in Twenty Twenty theme:
/* Sass - SCSS syntax */
$color1: #c6538c;
$color2: #a7a7a7;
.entry-title {
	a {
		font-family: MS Serif, -serif;
		background: -webkit-linear-gradient($color1, $color2);
		-webkit-background-clip: text;
		-webkit-text-fill-color: transparent;
	}
}
Help, My Custom CSS Isn’t Working!
If your custom CSS is not showing up on the page, check the following:
- Have you got any style rules in the Customizer that are overriding the styles you want to apply? You can check this by using Inspect Element on your browser.
- Are you using the correct CSS selector(s)?
- Is your style specific enough? Remember that in CSS, certain selectors outweigh others.
Adding WordPress Custom CSS is Easy When You Know How
If you are adding custom CSS in WordPress you have a few options.
Figure out what you want to achieve first before you decide which is the best way to do it. That might be overriding a few lines of CSS code, building a (child) theme or getting a plugin’s styles to match your branding.
And don’t forget to invest time in learning the CSS rules, so that you can create and modify styles like a pro.

Hi Claire,
thanks for the post. The revision part is interesting. Do you know another way then to install jetpack to get revisions?
To be honest I still use “simple custom CSS” plugin, because it is simple integrated in the Appearance Menu.